Are you tired of plain glass candle jars? Clear glass can look too simple, but you want a high-end, natural look. You struggle to find beautiful, natural finishes that don’t look cheap. I can show you how to get that premium, non-glass finish.
The best natural materials for a stunning, non-glass finish on candle jars are natural wood veneers, bamboo wraps, cork sheets, and textured paper made from cotton or recycled fibers. I find these materials offer an organic, tactile, and premium aesthetic that appeals to eco-conscious consumers and elevates the perceived value of your product.
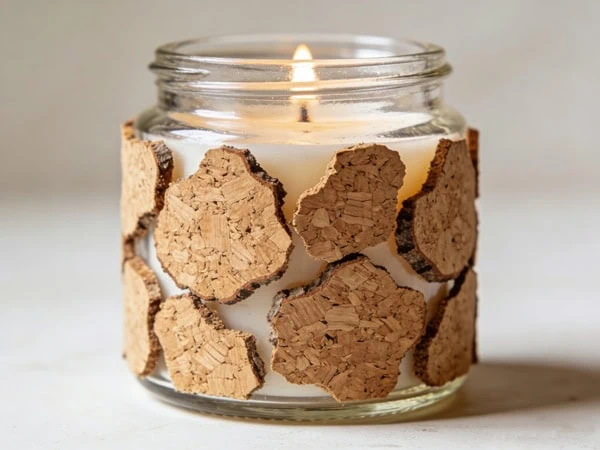
When I first started in the glass bottle business, I saw how much a simple jar could be transformed by the right decoration. It’s not just about the glass; it’s about the whole package. That desire for a premium look, especially one that feels natural and warm, is what drives many of my clients, and I want to share the best non-glass options I’ve seen work wonders. Let’s dig into these materials.
What is the best material for candle jars?
You are asking yourself if glass is truly the best option out there. You worry that using another material might be unsafe or look less professional. I will explain why glass is the standard, and how to safely choose alternatives.
Glass is the best material for candle jars because it is non-combustible, heat-resistant, and chemically inert, meaning it will not leach or react with the hot wax or fragrance. However, ceramic, concrete, and metal are also excellent, safe alternatives that offer a different aesthetic, but glass remains the safest and most transparent choice for candle safety inspection.
I have seen countless glass jars, and I know why they are the industry standard. Glass offers transparency, which lets you see the wax level, and it handles heat very well. When you think about alternatives, you must always put safety first. I tell all my clients to follow this rule: if you use a non-glass material, you must test its heat resistance under a long, full burn. The base and sides should never get too hot to touch safely. Concrete and ceramics are popular because they naturally offer a rough, earthy texture. Metal, like aluminum, works well but often requires an inner coating to prevent corrosion from the oils in the wax. Here is a quick breakdown of popular materials I often see used for candle containers:
Material Comparison for Candle Jars
| Material | Pros | Cons | WXglass Insight |
|---|---|---|---|
| Glass | Safest, heat-resistant, cost-effective for large runs. | Can break, heavy, can look generic without decoration. | We focus on custom shapes and finishes to make glass jars stand out. |
| Ceramic | Excellent heat resistance, handmade look, unique glazes possible. | Expensive, heavy, can have tiny pinholes that leak wax. | Perfect for a high-end, artisan product line. |
| Concrete | Very earthy and modern, highly durable, low heat transfer. | Very heavy, rough surface needs sealing, can chip easily. | Great for a minimalist, industrial brand aesthetic. |
| Metal (Tin/Aluminum) | Lightweight, unbreakable, easy to transport. | Can get very hot, needs a safety wick clip, potential for rust. | Best for travel candles and small, quick-burning test sizes. |
I always remind people that glass is easy to decorate with simple things, like a beautiful label or a natural fiber wrap. This is why I still believe glass is the most flexible choice. It gives you safety and a blank canvas to achieve any aesthetic, including that coveted non-glass feel, just by adding an outer layer.
What is the 84 rule for candles?
You hear technical terms like the “84 rule” and feel confused about what they mean for your candle’s safety. You worry that breaking this rule could lead to dangerous product recalls or injury. I will explain this simple safety guideline that you must follow.
The ’84 Rule’ is a basic safety guideline for selecting a candle wick diameter based on the container size. It suggests that the wick should create a melt pool that reaches about 80% to 85% of the container’s diameter during a full burn. This ensures a full, even melt pool, prevents tunneling, and keeps the flame away from the container walls, which prevents dangerous overheating.
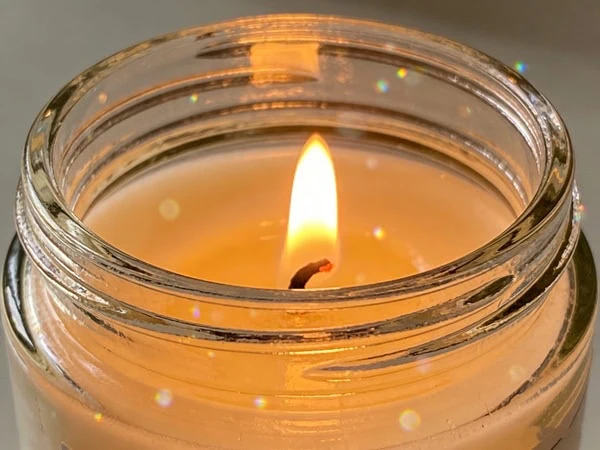
This rule is not an official, strict regulation, but it is a critical piece of industry wisdom that I learned early on. I remember seeing a batch of candles where the wick was too small for the jar. The result was a candle that burned straight down the middle, leaving a thick ring of unused wax. That is wasted product and a bad customer experience. Even worse, if the wick is too large, it heats the container walls too fast, which can cause a glass jar to crack or even shatter. This is a big problem for safety. Using the 84 rule helps you find that perfect balance. You must test your candle in three- to four-hour burn cycles until it reaches a full melt pool. You measure the diameter of the container and then look for a wick size that produces a melt pool close to 80% of that measurement. This is why testing is so important. I always advise my clients to test their glass containers with their chosen wax and wick combination for at least 40 hours. This is the only way to confirm the whole system is safe. I use the following steps when I test a new jar design for a client:
Safe Candle Testing Checklist
| Step | Action to Take | Why It Is Important | WXglass Tip |
|---|---|---|---|
| 1. Container Check | Ensure the container has no cracks or stress fractures before filling. | A small defect can become a major failure under heat stress. | Use only high-quality, heat-treated glass. |
| 2. Wick Selection | Choose a wick size that aims for the 80% melt pool on a full burn. | Prevents tunneling and dangerous container overheating. | Always use a wick clip/tab to secure the wick to the bottom. |
| 3. Initial Burn | Burn the candle for 3-4 hours, or until a full melt pool forms. | Establishes the memory burn and checks the initial flame size. | Check the flame height; it should not be too tall or smoky. |
| 4. Surface Temperature | Check the outside container temperature halfway through the burn. | The outside should be warm, but still safe to touch easily. | Use a non-contact thermometer to record the temperature. |
| 5. Final Check | Confirm that the wax has burned down safely to the last $1/2$ inch of wax. | Ensures the heat is not transferred directly to the surface below the container. | Always tell your customers to stop using the candle when only $1/2$ inch of wax remains. |
I know that making a candle is an art, but making a safe candle is a science. Following simple rules like the 84 rule is key to long-term success.
What paint is safe to use on candles?
You want to add a pop of color to your glass jars but you are unsure which paints are safe to use. Using the wrong paint could ruin your product, or worse, release toxic fumes when heated. I can tell you which paint types are safe and durable for candle jars.
The safest paints to use on the outside of candle jars are heat-resistant, non-toxic, water-based acrylic paints or specialized glass and ceramic paints. These paints cure or bake to form a durable finish that will not melt, chip, or release harmful volatile organic compounds (VOCs) when the jar heats up. You must always confirm the paint is rated for high heat and non-flammable.

I have seen many brands transform a basic clear jar into a stunning piece using paint. The key is in the type of paint and the application method. For glass, you need a paint that adheres really well and can handle the temperature changes. Regular craft paint is not going to work; it will peel or crack. My team works with specialized glass lacquers that are applied in a spray booth and then cured in a high-temperature oven. This baking process makes the color permanent and highly scratch-resistant. If you are doing this at home, you need to use a paint specifically labeled for glass or ceramics. These paints often require you to bake the jar in your oven for a certain time, which sets the finish permanently. I would never recommend painting the inside of a candle jar, because the paint could react with the hot wax or fragrance. It could also flake into the wax, which could clog the wick. Always keep your paint on the outside. Another safe option is powder coating, which gives a really nice matte, opaque finish. Here is a quick breakdown of my recommended paint options:
Safe Painting Options for Glass Candle Jars
| Paint Type | Best for… | Application Method | Safety Note |
|---|---|---|---|
| Baked Glass Paint | Opaque or transparent colors, factory finishes. | Spray-applied, then oven-cured at high heat (commercial setting). | The most durable and heat-resistant finish available. |
| Water-Based Acrylic | DIY or small batch hand-painting and stenciling. | Brush or sponge application, requires oven-baking to cure. | Check the label for ‘non-toxic’ and ‘dishwasher safe’ (indicates a cured finish). |
| Powder Coating | Matte, opaque, industrial, non-glass look. | Electrostatically applied, then baked. (Commercial setting). | Excellent durability; completely covers the glass to look like metal or ceramic. |
My advice is simple: use paint only on the exterior and follow the manufacturer’s directions exactly. A great finish makes the product, and a bad finish can destroy your brand’s reputation.
How to make shiny candles?
Your finished candles look dull or have an uneven, non-glossy surface. You want that smooth, high-end, shiny finish to attract more customers. I will share my best tips for getting a perfectly glossy candle top.
To make a candle look shiny and glossy, you need to ensure the wax temperature is correct when pouring, and you must use a heat gun on the surface after the candle cools to achieve a smooth, professional finish. I find that pouring at a slightly higher temperature, around $180^\circ\mathrm{F}$, and then using a heat gun to quickly re-melt the top layer of wax eliminates imperfections and gives a perfect, mirror-like gloss.
A shiny candle top is the sign of a professional product. I have seen so many beautiful glass jars filled with candles that have a terrible, pitted surface. That first impression is everything. The key to that glossy top is eliminating something called “pull-away” and “pitting.” This happens when the wax cools too quickly or unevenly. When the wax cools, it shrinks a little, and it pulls away from the center or the container walls, leaving a rough, uneven look. To fix this, you have two main strategies that I teach all my new candlemaking clients. First, control the pour temperature. Different waxes have different optimal pour temperatures, but generally, pouring a little hotter helps the wax settle smoothly. Second, and this is the most effective trick, is using a heat gun. After the candle has cooled for several hours and you see those rough spots, a quick, even pass with a heat gun on low heat will re-melt just the top $1/8$ inch of wax. This re-melted layer settles perfectly flat and gives you that beautiful, glossy finish. Do not hold the heat gun in one spot, or you will get a burn mark or a giant pit. You need to keep it moving slowly across the surface until the entire top is liquid again, and then you leave it alone to cool. It is also important to consider the type of wax you use. I find that pariffin and soy blends tend to give a much shinier, more professional surface finish than 100% natural soy wax, which often has a more rustic, matte look. If you want high gloss, I recommend moving away from pure natural waxes.
Tips for Achieving a Glossy Candle Top
| Step | Detail | Why It Works | WXglass Connection |
|---|---|---|---|
| 1. Controlled Pour | Pour wax at the hottest recommended temperature for your specific wax type. | Slower, more even cooling minimizes shrinkage and air bubbles. | A smooth glass surface also helps the wax cool evenly at the edges. |
| 2. Use a Heat Gun | After cooling, gently sweep a heat gun over the top surface for a few seconds. | This re-melts the surface layer, eliminating pits and rough textures. | This final touch makes any jar look like a premium product. |
| 3. Insulate While Cooling | Do not let the candle cool in a cold, drafty area. Place it in a warmer spot. | Slow, stable cooling is critical for an even, glossy finish. | Even if the jar is heavy, drafts can affect the surface cooling. |
I know that the small details make the biggest difference. That perfect glossy top is the final touch of quality that customers look for.
Conclusion
The best natural finishes for a non-glass look are wood, cork, or fiber wraps, which give an earthy, premium feel. Safety is always first, so use glass containers and follow the 84 rule for wicking.
